Contents

Here are some tips to help you take better travel photography photos.
These tips are a few ways you can improve your photography.
The intention is to make it easier, quicker and more fun to produce better pictures.
But if you’re starting out and looking for beginner travel photography tips, you might find something useful.
And don’t forget to check out our three steps to improve your travel photos.
If you improve your photography skills with these travel photography tips, I’m confident it will change how you see the world while travelling, as you will look for better angles and more interesting details.
It will make you notice the small things and improve your attention to detail.
It certainly did for me.
I now notice finer details everywhere I travel, which has deepened my appreciation for the world around me.
So, without further ado, here are my travel photography tips to help you take amazing photos!
1 | Keep Your Camera Out
This is why it is number one on my travel photography tips: when you are travelling, you can’t take any pictures with your camera in your bag.
Mine is usually away only when I’m passing through Customs!
You never know what you are going to see!
It also gives me a little extra space for other stuff in my bag.


2 | Understand How Your Camera Works
Number two of my travel photography tips is understanding how your camera works.
Once you understand how your camera works, you can achieve your desired goals.
Do you want a shallow depth of field, or do you want to freeze the action?
Understanding how your camera works doesn’t mean shooting in manual mode.
It means understanding that focal length, distance to subject, and aperture affect depth of field, and that ISO is the sensor’s sensitivity to light.
It also creates noisy images at higher ISO settings, and shutter speeds can be used to freeze action or create movement, such as light trails from vehicles or dancing street performers.
When you understand the relationship between these, you can achieve your goal through judgment rather than luck.
3 | Shoot an Auto Mode
This sounds contradictory to the above, but hear me out.
We pay a lot of money for cameras and equipment.
Your camera is full of technology, so let it do the work; after all, you’ve paid for it.
Shooting in manual mode because you think it makes you a better photographer is, in my opinion, madness.
There is a place for manual, but it’s not in my day-to-day travel.
Combining auto modes with mirrorless technology makes photography effortless.
Understand how your camera works and how each mode operates, such as how aperture priority lets you pick the aperture.
It will determine the shutter speed (and ISO if auto ISO is enabled). Let the camera do the work for you, not the other way around.
4 | Travel Light
I learned this during my first solo weekend trip abroad in Paris.
I took a complete DSLR kit.
Coupled with Converse All-Stars and walking miles and miles every day, I can tell you that was a wrong decision!
My feet have never been in such pain.
The kit alone weighed almost 1/6 of my weight!
When you travel, take what you know you need, not what you think you need.
Over the years, I have become very efficient in what I carry when I travel, and now I travel with mostly minimalist travel photography gear.
I used to think I was better looking at it than looking for it, but that never served me well because I had to carry everything myself, which isn’t always fun.
I’m small and don’t like heavy stuff.
I identified what I used most and eliminated what I used less.
Take the leap. You won’t regret it.
I’ve seen photographers with kits complete with tons of batteries, memory cards, filters, and lenses.
Do they think they will use all this equipment?
I rarely take a battery charger because my Fujifilm X-T5 plugs into the same charger as my phone and laptop.
I don’t carry spare cards or batteries either.
The battery lasts forever, and I have two cards in the camera, and that’s it.
I’ve not had a card fail me yet.
That’s not to say it won’t happen one day, but based on my experience, I am willing to take the risk.

Now that we’ve covered the basics, we can focus on the travel photography tips that will make your photos more compelling.
5 | Do Your Research
This will help you maximise your time by clarifying where you want to go and what you want to shoot while you travel.
We all know of ‘tourist hotspots’; the same goes for photogenic places.
Search Google or Instagram, and you’ll see patterns emerging on what’s worth photographing wherever you travel.
I do this before and during travel – you never know what you’ll find.
Don’t just rely on this research, though.
Stick to number 10 of my travel photography tips to find those hidden gems.


6 | Learn Some Compositional Techniques
Next up on our travel photography tips list is composition.
So, what is composition?
In photography, it means “…arrangement of parts of a picture.”
You need to learn the absolute number 1 rule to fill the frame.
This is probably the most common problem I see.
What are you trying to photograph, and is the other stuff in the frame relevant?
Sometimes, negative space is valuable and aids composition, but it’s usually because the photographer doesn’t know how to use the subject or what should be in the frame.
There is a ton of information on the internet about compositional techniques, and we’ve compiled a list of the ten best photography composition techniques to help get you started.
In the meantime, here’s a list of some basic techniques to get you started or improve your composition for your travel pictures, with some examples below:
- Rule of thirds
- Leading lines
- Symmetry
- Frame in a Frame
- Pattern
- Texture


7 | The Three C’s
Further to the point above, is it high-contrast, cute, or colourful?
OK, I’ve made this one up, but it’s a surefire winner to get a good picture!
Hit one of these three in your travel pictures, and you win.
Remember, it doesn’t have to be an animal to be cute. It could be a pretty little village or shop front.
Look for colour and contrast, too – we are naturally interested in them, and they help capture our attention.
Contrast also helps us distinguish subjects, so use it to your advantage.
Contrast doesn’t have to be the difference between highlights and shadows.
It can be the contrast of an old building next to a modern one or an old car next to a new car, called ‘juxtaposition’.


8 | Stick Something in the Foreground
#8 of my travel photography tips is my go-to method for adding more interest and depth to my pictures.
Using the correct aperture can help enhance the foreground in your photographs.
Consider foreground, middle ground and background every time you take a picture.
Is the foreground interesting, and is the background distracting?
Once you learn to use your camera, you can use its functions to help you.
For example, you could use a wide aperture to blur the background and remove tourists, or keep the aperture the same to blur a bush in the foreground.
Using this technique can help to focus the viewer on your subject.


9 | The Golden and Blue Hours
Consider shooting during the golden and blue hours to enhance your travel photography.
Of course, they aren’t each an hour; they are just given those names.
The golden hour is the time before sunset and after sunrise, when the sun is up, hence golden.
The blue hour is the bit after sunset or before sunrise when the sun is below the horizon.
Golden hour can lead to some gorgeous warm tones, but I prefer the blue hour.
The tones are often a little more unusual, with rich blues, purples and even some pinks and magentas in the sky.
The light is often softer and easier to manage than that of the sun, which still blasts rays before it disappears.
Have a play, and don’t forget to wait a little bit. You never know what you will get.
In Santorini, we watched the sunset at undoubtedly one of the world’s most magical sunset spots.
But that wasn’t the best bit.
The best bit came when the blue hour was in full swing.
The light softened, the colours came alive, and everyone else had disappeared.


10 | Look for the Light
It’s not always possible to shoot when the light is at its best, and we’re often told to avoid the midday sun because it’s direct and harsh.
But if this is your only option, it’s not the end of the world.
You have to look for the right light.
Direct light reflected will often provide soft light.
Even dappled light coming through the trees can provide a pleasant effect.
You need to learn to look for it.
Look at the shot below.
It was taken in the City of London, where I saw the pool of light there for the taking.
It was reflected in the streets between the towering skyscrapers on a bright, sunny day.
The light didn’t last long, but lent itself to a nice shot.

11 | Walk as Much as Possible
You can’t absorb a place on public transport as easily as you can on foot.
Getting around on foot will also help you get off the beaten track.
And don’t worry about getting a little lost, wander and see what you find.
You might be surprised by some things you find along the way.
I suspect most people have access to Google Maps or Apple Maps, so if you’re concerned about losing your mobile signal, getting lost, or incurring expensive roaming charges, consider downloading the area you’re travelling to to your device while you have access to WiFi.
You can learn how to do that in Google Maps HERE.


12 | Work Around Your Subject
Find interesting things or places to photograph while you travel, such as a local market—it is full of interesting things.
Once you’ve found something interesting, don’t just take one picture; take a few.
Look for different angles, viewpoints, perspectives, and finer details.
You can tell your story by working around a subject and using different shot sizes.
By this, I don’t mean the picture’s actual size.
In simple terms, I mean shots to establish a scene (establishing shot), followed by medium and close-up shots, where you dig into those finer details.
For more information on shot sizes, click HERE.
The link discusses shot sizes in video production, but the principles apply to travel photography as well.
Take a cafe, for example.
You might want to show the facade to establish your location.
From there, you might want to show the interior, as it’s full of character and provides more information about the cafe than the exterior.
Finally, you might want to photograph your coffee and cake because they look delicious—and that’s what you were there for!
In three shots, you have told a story about a cool corner cafe with a quirky interior that serves the most awesome Victoria sponge cake on the planet.
Get the picture?
Pun intended!


13 | Consider It Record Keeping
One of the best bits about my job is that I get to record where I’ve been, what I’ve done, what I’ve seen and met, and some historic moments along the way.
Treat your travel photography as a form of record-keeping.
What do you want to remember from your trip?
Do you want to remember that delicious cake and coffee you devoured at the town square cafe? Well, photograph it!
Don’t let keyboard warriors online tell you not to photograph your food.
It’s your journey, not theirs.
This will also help you pay attention to detail.
And what about when you can look back on your travels and see how things have changed, developed, or even sparked a memory you have forgotten?
But…
14 | Know Your Story
Are you taking pictures for your benefit or to share?
What story are you trying to tell with your photos?
Photograph intentionally, not just for the sake of it.
Are you trying to record where you’ve been and what you’ve done, or are you trying to show how amazing a place is and why your friends should visit?
Consider why you are taking pictures while you travel, what you are photographing, and where the images will go.
15 | Be Confident
Number 14 of my travel photography tips is to be confident.
Early in my photographic career, I learned that people generally like to engage with a photographer.
The camera is often a common ground and an icebreaker to talk about.
Even if you don’t speak the same language, everyone knows what a camera is, what it does and what you want to achieve with a few finger points and gestures.
But have the confidence and respect to approach people and ask them to take their picture – they might even want a copy!


16 | Have a Point of Interest or Add a Human
Don’t just shoot a landscape or location; add something to it to create extra interest.
Maybe that’s someone standing at the end of a cliff or a house in some trees.
It will add some interest, scale or perhaps context to another landscape.


17 | Revisit the Same Locations
Before I get into this one, I’m going to caveat it!
I realise you might not have much time in a location, but hear me out on why you should use this travel photography tip to get the most out of your photography while you’re on your travels, and why a little bit of dedication might lead to better travel photos.
When I worked in London, I worked on a project cleverly named ‘Monopoly Project’, where I photographed every space on the Monopoly board.
From that 12-month project, I learned that I had to revisit the same places repeatedly for several reasons to achieve my goals.
Sometimes I couldn’t see the shot; there wasn’t anything interesting happening, there was too much going on, or the conditions weren’t right.
I visited one location five times before I got what I wanted, and it was a fleeting moment.
If you haven’t found what you’re looking for, revisit the location; you may find something new.
If you’re in a city, the best time to get out with your camera and explore the quiet, peaceful streets is before the shops open.
You’ll have the streets to yourself and see a side of the city you might not see.
18 | Learn to Edit
Whether you travel with a laptop or phone, learn to edit the pictures you’ve taken to improve your travel photography.
Most of the time, images need minor enhancement to make them stand out and bring out the best.
You can take a good picture ‘straight out of the camera’, and it can be even better if you know how to enhance it.
I’m not talking about sky replacement or photoshopping things in and out—I’m talking about some simple tools to bring your travel pictures to life, like minor colour adjustments, contrast, or even a bit of sharpening.
Suppose you don’t want to lug a laptop when you travel but have a decent smartphone and a camera with Wi-Fi.
In that case, you have some powerful apps, such as Photoshop Express or Instagram’s editing tools.
You can adjust all sorts of things, from cropping to image rotation, to colour adjustment and sharpening, and many other things to stylise your shots.
These apps even have presets that do the work if you don’t want to do it yourself.
Just as with your camera’s technology, use this technology to your advantage.


19 | Think FLECS
We’re almost at the end of our travel photography tips, so here’s one to summarise things and something you should remember every time you press that shutter release button!
If you haven’t guessed, it’s an acronym for Focus, Lighting, Exposure, Composition and Story.
Is it in focus?
Is the lighting complementary to the shot?
Is it exposed correctly?
Is it well-composed?
Does it tell the story you are trying to convey?
Couple this acronym with a few other travel photography tips above, and you won’t go far wrong!
20 | Have Fun
If you’ve reached this point, thank you for sticking with me.
Last but certainly not least, have fun.
If photography isn’t fun, you won’t want to do it.
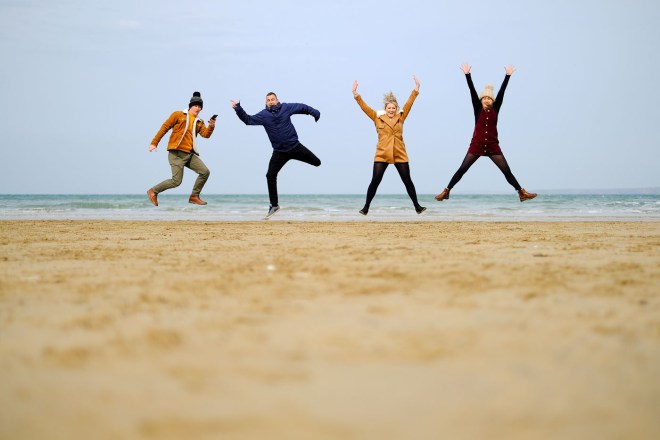
Travel photography should be fun, not a chore. It should be a way for you to express yourself, explore, see, and connect with the world around you (most of those are reasons we travel, too, right?).
You can make travel photography fun in all sorts of ways.
That might be by choosing the subjects you photograph, setting yourself a challenge (like using only your mobile phone or sticking to one lens), practising a new skill or technique you have learned, or even experimenting in Photoshop to see what magic you can create in the digital art world.
You may also take pleasure in photography by simply snapping away at anything and everything while you travel—the choice is yours!


To keep up with our travels, please subscribe to our mailing list. We won’t spam you; we’ll only contact you with exciting news and new stuff! Enter your email in the box below and hit subscribe!

Pingback: An Epic Road Trip to Scotland Part 1 | Argyll | Van Life | The Bumper Crew
Pingback: A Weekend at Autograss Racing | Shropshire |A Weekend at Autograss Racing - An Outsider's View The Bumper Crew
Pingback: 5 Uplifting Things to Do in Hay on Wye | Book Town | The Bumper Crew
Pingback: 12 Best Things to Do in Munich, Germany | The Bumper Crew
Pingback: The 18 Very Best Things to Do in Santorini, Greece | The Bumper Crew
Pingback: The Impressive Sigma 56mm f1.4 Fujifilm: a Travel Photographer's Review | The Bumper Crew
Pingback: An Honest and Essential Travel Photography Gear Guide | Fujifilm X-Series | The Bumper Crew